This is a step-by-step guide to installing the HEX ezCAN Ordos for KTM.
IMPORTANT: This installation guide is only applicable to the KTM motorcycle models listed below. If you are purchasing a HEX ezCAN for, or installing a HEX ezCAN on a KTM that is not in the model list below, refer to the HEX ezCAN Gobi for KTM Bikes to see if this acceesry manager supports your KTM. If not, the HEX ezCAN PURE Universal Accessory Manager supports pretty much any 12V motorcycle, including models that do not have a CAN-bus system.
Stap 1: De software downloaden, installeren en configureren
Stap 1
De software downloaden, installeren en configureren
Getting Started: Initial Setup Checklist
Before you begin the physical installation, complete these quick preparation steps:
Unbox your HEX ezCAN and check that all components are present.
Plan your accessories: Decide which devices you want to install and check their power requirements.
Note: Pay attention to specific circuit requirements. For instance, ‘smart’ Certified ezBUS-Ready accessories need to be wired into the ezBUS (White) power circuit.
Review the manual: Read the Installing for Life section in the HEX ezCAN User Manual (available to download from the website) to make sure your planned setup meets the recommended guidelines.
Register your device: Simply connect the HEX ezCAN to your computer using the provided USB cable. You can easily complete this step from the comfort of your desk before heading out to the bike.
Step 2: Locate the Battery and OBD-II Diagnostics Connector
Stap 2
Locate the Battery and OBD-II Diagnostics Connector
Benodigde gereedschappen:
10mm wrench or socket to connect the HEX ezCAN to the battery terminals
Access the vehicle battery and OBD-II connector as follows:
Verwijder de bestuurders- en passagiersstoelen.
Als uw motorfiets verwarmde zadels heeft, koppel dan de stekkers van de zadelverwarming onder het zadel van de bestuurder en het duozadel los.
Locate the bike’s battery terminals (See below left).
Cable Routing: The HEX ezCAN battery terminal cables can be routed underneath the sub-frame cross-brace, from the space underneath the pillion seat.
The HEX ezCAN Ordos connects to the KTM CAN-bus via the OBD-II Diagnostics Terminal (below, right).
Location of the Battery Terminals
Location of OBD-II Diagnostics Terminal
Stap 3: Sluit de HEX ezCAN aan op de CAN-BUS van de fiets.
Stap 3
Sluit de HEX ezCAN aan op de CAN-BUS van de fiets.
Remove dust cover from the OBD-II terminal.
Connect the HEX ezCAN Ordos CAN-Bus connector to the OBD-II terminal.
Make sure that the connection is inserted straight and firmly pushed into the terminal.
Remove the dust cover from the OBD-II terminal.
Stap 4: Sluit de HEX ezCAN aan op de accu van de fiets
Stap 4
Sluit de HEX ezCAN aan op de accu van de fiets
The best location for the main body of the HEX ezCAN device is underneath the pillion seat.
When planning your accessory cables, ensure that the wiring is routed safely and securely, in a way that does not allow it to chafe or pinch. Where needed, secure all wiring to frame tubes or other components using the cable ties supplied with the HEX ezCAN installation kit.
WAARSCHUWING: Om veiligheidsredenen moet u altijd eerst de minpool van de accu loskoppelen en deze als laatste weer aansluiten.
Start the installation by locating the main body of the HEX ezCAN in a place that allows straightforward, logical wiring runs. We recommend installing the HEX ezCAN main body underneath the pillion seat area, as this allows easier access for firmware updates and diagnostics.
Route the HEX ezCAN battery terminal connection underneath the sub-frame cross-brace.
Koppel de negatieve kabelboomterminal los van de negatieve accupool.
Koppel de positieve kabelboomterminal los van de positieve accupool.
Sluit de aansluiting op de oranje ezCAN-voedingskabel en de positieve kabelboom van de motorfiets aan op de positieve pool van de accu.
Sluit de aansluiting op de bruine ezCAN-voedingskabel en de negatieve kabelboom van de motorfiets aan op de negatieve pool van de accu.
Maak de CAN-bus en de batterijkabel netjes. Zet alle losse kabels vast met de kabelbinders die in de HEX ezCAN-installatiekit zitten.
Opmerking: De status-LED van de HEX ezCAN moet ongeveer een minuut lang continu groen branden nadat deze op de accu is aangesloten. Na deze tijd gaat de HEX ezCAN in de slaapstand en is er geen LED-activiteit totdat het contact van de motorfiets wordt ingeschakeld.
Sluit de HEX ezCAN aan op de positieve accupool en vervolgens op de negatieve accupool. Zorg dat de kabels netjes en stevig vastzitten. Zorg ervoor dat je makkelijk bij de vier stekkers van het stroomcircuit kunt.
Stap 5: Sluit de accessoires aan met behulp van kleurcodering
Stap 5
Sluit de accessoires aan met behulp van kleurcodering
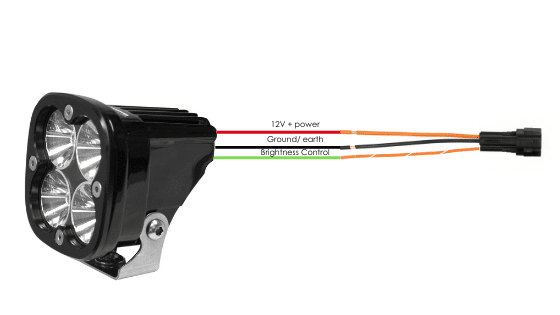
De HEX ezCAN-installatiekit bevat vier tweedraads stubconnectoren met mannelijke aansluitklemmen, oranje stroomdraden en zwarte aardingsdraden.
De volgende onderdelen zijn ook inbegrepen:
4x pulsbreedtemodulatie (PWM) aansluitdraden (oranje met witte markering)
4x rubberen afdichtingen
Als het accessoire dat op een stroomcircuit moet worden aangesloten drie draden heeft, moet u een tweedraads stekker ombouwen naar een driedraads stekker, zoals weergegeven in het gedeelte 'Aansluiten van 3-draads LED-lampen' van de HEX ezCAN-gebruikershandleiding (hier te downloaden).
Als het accessoire dat op een stroomcircuit moet worden aangesloten twee draden heeft, dicht dan de lege aansluitingsholte van de stubconnector af zoals weergegeven in het gedeelte '2-draads accessoires aansluiten' van de HEX ezCAN-gebruikershandleiding.
Als een van de stroomcircuits van de HEX ezCAN niet wordt gebruikt, raden we u aan een afdichtplug aan te sluiten op de uitgangsplug van elk ongebruikt circuit.
2-draads toepassingen: plaats een afdichtingsplug. 3-draads toepassingen: plaats een PWM-aansluitdraad.
4 x aansluitdraden en afdichtingsringen
4 x tweedraads stubconnectoren
Sluit de mannelijke aansluiting van elke stubconnector aan op de relevante vrouwelijke HEX ezCAN-voedingscircuitconnector (zie hieronder).
Een 2-draads accessoire aansluiten op een HEX ezCAN-stubconnector:
Sluit de aardingsdraad van het accessoire (deze is meestal, maar niet altijd zwart of bruin) aan op de aardingsdraad van een HEX ezCAN-stubconnector.
Sluit de voedingskabel van het accessoire (deze is meestal, maar niet altijd rood) aan op de 12V-voedingskabel van een HEX ezCAN-stubconnector.
Een 3-draads accessoire aansluiten op een HEX ezCAN-stubconnector:
Sluit de aardingsdraad en de stroomdraad van het accessoire aan zoals hierboven beschreven.
Sluit de PWM-besturingskabel van het accessoire aan op de tweekleurige kabel (effen kleur + tracer) van een ezCAN-stubconnector.
Connecting ‘smart’ Certified ezBUS-Ready accessories to a HEX ezCAN stub connector:
Lees de secties HEX ezBUS en Configureren van HEX ezBUS-functionaliteit in de HEX ezCAN-gebruikershandleiding (hier te downloaden) voor gedetailleerde informatie over het gebruik van de ezBUS-functionaliteit.
If you are installing ‘smart’ Certified ezBUS-Ready accessories (that is, accessories capable of intelligent input and control through the HEX ezCAN’s LIN bus), note the following:
Slimme accessoires (waaronder de HEX ezSWITCH) mogen alleen worden aangesloten op het ezBUS-stroomcircuit (wit) van de HEX ezCAN. Slimme accessoires werken niet als ze worden aangesloten op de rode, gele of blauwe circuits.
The ezBUS (white) power circuit can accommodate upto a maximum of fifteen Certified ezBUS-Ready accessories.
Er is een selectie van HEX ezBUS-adapters en -connectoren beschikbaar, waarmee u slimme accessoires snel en eenvoudig kunt aansluiten. Zie het gedeelte ezBUS-accessoires van de HEX Innovate online winkel voor meer informatie.
Lees de secties HEX ezBUS en Configureren van HEX ezBUS-functionaliteit in de HEX ezCAN-gebruikershandleiding (hier te downloaden) voor gedetailleerde informatie over het gebruik van de ezBUS-functionaliteit.
Note that if the white circuit is set to ezBUS mode, its fuse trip limit is set to 15 Amps by default. If needed, ezBUS PWR functionality can be used to increase the white circuit’s current capacity to a suggested maximum of 25 Amps in ezBUS mode. See the relevant section of the HEX ezCAN User Manual for details.
BELANGRIJK:
The four output circuits on your ezCAN are colour-coded. When you plug in an accessory—like auxiliary lights, a horn, or a brake light—just take note of the wire colour for that specific circuit.
When you open the HEX ezCAN software, you’ll see those exact same colours listed under the Circuit Functions section. Simply match the software configuration to the wire colour you connected your accessory to, and you’re good to go!
Plug it in: Connect your accessory to a colour-coded circuit output.
Match it up: Open the ezCAN software and select the matching colour to assign its function.
Easier Installation with the HEX ezCAN Accessories
Whether you’re fitting front spot lights, a extra rear brake light, a loud air horn, or your favourite heated kit, HEX ezCAN has you covered.
We offer a complete range of cables, adaptors, splitters, and connectors to help you wire up virtually any combination of electronic gear to your ezCAN—plus plenty of spare connectors to keep in your toolkit for future builds.
Click the links below to explore the full range of accessories:
WAARSCHUWING: Test en controleer uw installaties en accessoires in een veilige, gecontroleerde omgeving voordat u ze voor het eerst gebruikt. Wees altijd voorzichtig. Wees extra waakzaam wanneer u nieuwe functies of accessoires test. U doet dit op eigen risico.
DISCLAIMER: HEX Innovate is niet aansprakelijk voor enig letsel of schade, hoe dan ook veroorzaakt, en alle producten en diensten worden op eigen risico gebruikt.
Voordat u de installatie van HEX ezCAN voltooit of verwijderde onderdelen opnieuw installeert, is het belangrijk dat u alle nieuw geïnstalleerde accessoires test op een goede pasvorm en correcte werking.
Veel HEX ezCAN-aangedreven accessoires kunnen worden getest door het contact aan te zetten en de betreffende bedieningselementen te gebruiken. Uitzonderingen zijn onder andere:
Accessoires waarvoor u de functie Alleen wanneer motor draait hebt ingeschakeld (voorbeelden hiervan zijn Aux 1-lampjes, Aux 2-lampjes, MotoLights en verwarmde kleding). Om deze functies te testen, moet de motor van de motorfiets draaien.
Voor sommige remlichtfuncties moet de motorfiets met een bepaalde snelheid of hoger rijden. Zo vereisen de functies 'Knipperen bij noodstop' en 'Knipperen bij snel remmen' een vertraging van meer dan 21 kilometer per uur per seconde.
Stap 7: Voltooi de installatie
Stap 7
Voltooi de installatie
Voltooi de installatie van HEX ezCAN als volgt:
Zorg ervoor dat het hoofdgedeelte van de HEX ezCAN goed is bevestigd op een plek waar het beschermd is tegen druk, hitte en schokken.
Zorg ervoor dat alle fabrieks-, ezCAN- en accessoirekabels en kabelbomen voldoende afstand houden van alle bewegende onderdelen en stevig zijn bevestigd. Gebruik indien nodig de kabelbinders die zijn meegeleverd in de HEX ezCAN-installatiekit.
Vervang alle motorfietsonderdelen en bevestigingsmiddelen die mogelijk zijn verwijderd om de installatie van ezCAN te vergemakkelijken.
Controleer de volledige installatie op fouten of problemen en los alle geconstateerde problemen op.
Test alle nieuwe accessoires nogmaals op correcte werking.
Als u dat nog niet hebt gedaan, download dan de HEX ezCAN-gebruikershandleiding vanaf deze pagina. Bewaar de handleiding op een veilige plek op uw computer, tablet of telefoon: deze bevat alle informatie die u nodig hebt om de HEX ezCAN te bedienen en de functionaliteit ervan aan te passen.
Let op!
U wordt nu doorgestuurd naar onze primaire website om ons privacybeleid te bekijken.
We gebruiken cookies om ervoor te zorgen dat u de beste ervaring op onze website heeft. Als u deze site blijft gebruiken, gaan we ervan uit dat u hiermee akkoord gaat.