Decida qué accesorios va a instalar, cuántos y cuáles son sus requisitos. ¿Algunos accesorios deben conectarse de una manera específica y/o a circuitos eléctricos específicos? Por ejemplo, los accesorios «inteligentes» de baja potencia suelen instalarse en el circuito eléctrico ezBUS (blanco).
Lea la sección«Instalación para toda la vida»del Manual del usuario de HEX ezCAN (que puede descargarse aquí) y evalúe la instalación que tiene prevista según las directrices que se indican en dicha sección.
Registre su HEX ezCAN (Todo lo que necesita hacer para registrar el ezCAN es conectarlo a su ordenador utilizando el cable USB suministrado, lo que significa que puede hacerlo cómodamente desde su escritorio).
The IMU (Inertial Measurement Unit) connector is located under the rear part of the fuel tank. Access the IMU connector as follows:
Retire los asientos delanteros y traseros.
Use the 5mm Allen wrench to remove the four trim retaining screws (yellow arrows, below).
3. The plastic side trim panels below the front seat are held in place by plastic clips. Gently pull the upper edges of both side trim panels away from the bike’s frame (green arrows, below).
4. Use the 5mm Allen wrench to remove the two retaining screws (yellow arrows, above).
5. Use the 10mm wrench or socket to remove the fuel tank retaining screw (blue arrow, above).
6. Remove the two black plastic parts that were freed by removing the screws in the steps above (yellow arrows, above). The fuel tank mounting bracket will be exposed.
7. Use the 8mm wrench or socket to remove the four fuel tank mounting bracket retaining screws (white arrows, above).
8. Carefully lift the rear edge of the fuel tank.
9. Remove the fuel tank mounting bracket.
Paso 2: Localice la batería.
The battery is located on the left side of the motorcycle, under the tool compartment and above the starter motor.
Access the battery terminals as follows:
1. Use the 5mm Allen wrench to remove the two tool compartment retaining screws (yellow arrows, below).
2. Remove the tool compartment.
The battery terminals will be exposed.
Paso 3: Conecte el HEX ezCAN al CAN-BUS.
Paso 3:
PLUG THE HEX ezCAN INTO THE CAN-BUS
IMPORTANT: Do not connect the HEX ezCAN’s CAN-bus connector to any part of the motorcycle other than the IMU connector. If you do, the ezCAN will not function.
1. Install the main body of the HEX ezCAN in the vicinity of the IMU connector. 2. Remove the female IMU connector from the bike’s IMU module. The IMU connector and module are located under the rear edge of the fuel tank, slightly forward of the rear fuel tank mounting point (green arrow, below).
3. Connect the male HEX ezCAN CAN-bus connector to the female IMU connector (green arrow, above). 4. Connect the female HEX ezCAN CAN-bus connector to the bike’s IMU module (green arrow, below).
Paso 4: Conecte el HEX ezCAN a la batería de la bicicleta.
Paso 4:
CONNECT THE HEX ezCAN TO THE BIKE'S BATTERY
Ensure that all wiring is routed safely and securely in a way that does not allow it to chafe or pinch. Where needed, secure all wiring to frame tubes or other components using the cable ties supplied with the HEX ezCAN installation kit.
ADVERTENCIA:Por razones de seguridad, desconecte siempre primero el terminal negativo de la batería y vuelva a conectarlo en último lugar.
1. Disconnect the negative wiring harness terminal from the negative battery pole. 2. Disconnect the positive wiring harness terminal from the positive battery pole. 3. Open the rubber lid of the HEX ezCAN’s main fuse housing, and temporarily remove the fuse. This will make it easier to route the ezCAN power cables and fuse housing through tight spaces. 4. Route both ezCAN power supply cables forward from the HEX ezCAN’s main body along the left side of the bike, under the fuel tank mounting bracket and toward the battery (broken green line, below).
5. Position the HEX ezCAN power supply cables in such a way that the fuse holder is located above the battery (green arrow, below). If the fuse holder is located on the visible side of the battery, it will prevent the tool compartment from fitting correctly.
6. Connect the terminal on the orange ezCAN power cable, and the bike’s positive wiring harness terminal, to the positive battery pole. 7. Connect the terminal on the brown ezCAN power cable, and the bike’s negative wiring harness terminal, to the negative battery pole. 8. Reinstall the HEX ezCAN’s main fuse into the fuse holder, and close the rubber lid of the fuse housing. 9. Tidy the CAN-bus and battery cable routing, making sure you have easy access to the four power circuit plugs. 10. Secure all loose cables using the cable ties included in the HEX ezCAN installation kit.
Nota: El LED de estado del HEX ezCAN debe permanecer en verde fijo durante aproximadamente un minuto después de conectarlo a la batería. Transcurrido este tiempo, el ezCAN entra en modo de suspensión y el LED permanecerá inactivo hasta que se encienda el contacto de la motocicleta.
Step 5: Connect the accessories, using the colour coding
Paso 5:
CONECTE LOS ACCESORIOS UTILIZANDO EL CÓDIGO DE COLORES
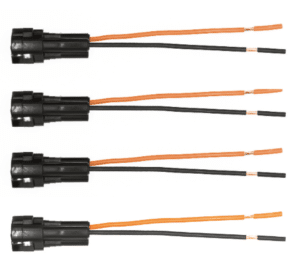
El kit de instalación HEX ezCAN incluye cuatro conectores de dos cables con terminales de conexión macho, cables de alimentación naranjas y cables de tierra negros.
También se incluyen las siguientes piezas:
4 cables terminales de modulación por ancho de pulso (PWM) (naranja con trazador blanco)
4 juntas de goma
Si el accesorio que se va a conectar a un circuito de alimentación tiene tres cables, convierta un conector de dos cables en un conector de tres cables, tal y como se muestra en la sección«Conexión de luces LED de 3 cables»del manual de usuario de HEX ezCAN (que se puede descargar aquí).
Si el accesorio que se va a conectar a un circuito de alimentación tiene dos cables, selle la cavidad del terminal vacío del conector corto tal y como se muestra en la sección«Conexión de accesorios de 2 cables»del Manual del usuario de HEX ezCAN.
Si no se va a utilizar alguno de los circuitos de alimentación del HEX ezCAN, recomendamos conectar un tapón ciego al conector de salida de cada circuito no utilizado.
Aplicaciones de 2 hilos: inserte un sello de obturación. Aplicaciones de 3 cables: inserte un cable terminal PWM.
4 cables terminales y sellos de obturación
4 conectores de derivación de 2 hilos
Conecte el terminal macho de cada conector corto al conector hembra HEX ezCAN del circuito de alimentación correspondiente (abajo).
Conexión de un accesorio de 2 cables a un conector HEX ezCAN:
Conecte el cable de tierra/masa del accesorio (que suele ser, aunque no siempre, de color negro o marrón) al cable de tierra de un conector HEX ezCAN.
Conecte el cable de alimentación del accesorio (que suele ser rojo, aunque no siempre) al cable de alimentación de 12 V de un conector HEX ezCAN.
Conexión de un accesorio de 3 cables a un conector HEX ezCAN:
Conecte el cable de tierra y el cable de alimentación del accesorio tal y como se ha descrito anteriormente.
Conecte el cable de control PWM del accesorio al cable de dos colores (color sólido + trazador) de un conector HEX ezCAN stub.
Conexión de accesorios inteligentes de bajo consumo a un circuito eléctrico:
Si va a instalar accesorios «inteligentes» (es decir, accesorios de bajo consumo capaces de realizar entradas y controles inteligentes a través del bus LIN del HEX ezCAN), tenga en cuenta lo siguiente:
Los accesorios inteligentes (incluido el HEX ezSWITCH) solo deben conectarse al circuito de alimentación ezBUS (blanco) del HEX ezCAN. Los accesorios inteligentes no funcionarán si se conectan a los circuitos rojo, amarillo o azul.
El circuito de alimentación ezBUS (blanco) puede alojar cualquier número de accesorios individuales, hasta un máximo de quince.
Hay disponible una selección de adaptadores y conectores HEX ezBUS que le permiten conectar accesorios inteligentes de forma rápida y sencilla. Consulte la sección Accesorios ezBUS de la tienda online HEX Innovate para obtener más información.
Lea las secciones «HEX ezBUS» y «Configuración de la funcionalidad HEX ezBUS» del manual del usuario de HEX ezCAN (que puede descargarse aquí) para obtener información detallada sobre cómo utilizar la funcionalidad ezBUS.
Tenga en cuenta que si el circuito blanco está configurado en modo ezBUS , su límite de disparo del fusible está establecido en 15 amperios de forma predeterminada. Si es necesario, se puede utilizar la función ezBUS PWR para aumentar la capacidad de corriente del circuito blanco hasta un máximo de 30 amperios en modo ezBUS. Consulte la sección correspondiente del Manual del usuario de HEX ezCAN para obtener más detalles.
IMPORTANTE: Si los conectores accesorios incluidos en el kit de instalación de HEX ezCAN no tienen cables de alimentación naranjas, sino que tienen colores que coinciden con los colores de los circuitos de alimentación de ezCAN (como se ve a continuación), conecte siempre los cables del mismo color (el conector rojo al circuito de alimentación rojo, el conector azul al circuito de alimentación azul, y así sucesivamente).
INSTALACIÓN MÁS FÁCIL CON EL KIT DE EXTENSIÓN HEX ezCAN
El kit de extensión HEX ezCAN contiene todo lo necesario para conectar luces auxiliares delanteras, luces accesorias traseras y una bocina al HEX ezCAN. También incluye conectores adicionales que permiten conectar otros accesorios.
2 cables de extensión de 1,5 m y 3 núcleos (normalmente utilizados para luces auxiliares delanteras de 2 o 3 cables)
1 cable alargador de 3 hilos de 0,5 m (normalmente utilizado para la luz trasera de marcha/freno)
1 cable alargador de 1,5 m y 2 conductores, con conectores de horquilla (normalmente utilizado para conectar bocinas de aire u otros accesorios de 2 cables).
3 conectores MT-3 hembra, incluyendo clavijas y sellos para terminales.
Kit de 5 conectores MT-3 macho, incluyendo clavijas y juntas para terminales.
5 juntas de goma (utilizadas en los casos en los que solo se utilizan dos terminales en un conector MT-3 de 3 hilos)
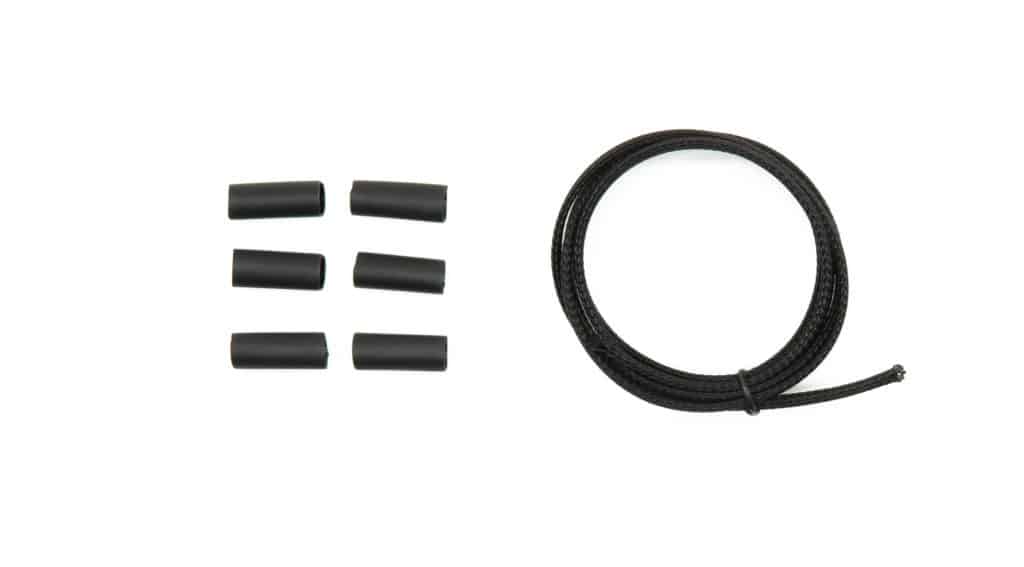
6 secciones de 20 mm de tubo termorretráctil con revestimiento adhesivo
2 terminales conector hembra tipo pala de 6,3 mm
Revestimiento de cable de 1 m
Extensiones de luces auxiliares delanteras
Extensión de bocina
Tubo termorretráctil con revestimiento adhesivo y funda de 1 m.
Extensión de freno/accesorios
Paso 6: Prueba la instalación
Paso 6:
PRUEBA LA INSTALACIÓN
ADVERTENCIA: Pruebe y compruebe sus instalaciones y accesorios en un entorno seguro y controlado antes de utilizarlos por primera vez. Se recomienda precaución en todo momento. Se requiere especial atención al probar nuevas funciones o accesorios. Lo hace bajo su propia responsabilidad.
DESCARGO DE RESPONSABILIDAD: HEX Innovate no se hace responsable de ninguna lesión o daño, independientemente de su causa, y todos los productos y servicios se utilizan bajo su propia responsabilidad.
Antes de finalizar la instalación de HEX ezCAN o reinstalar cualquier componente que haya retirado, es importante que compruebe que todos los accesorios recién instalados se ajustan correctamente y funcionan de forma satisfactoria.
Muchos accesorios que funcionan con HEX ezCAN pueden probarse encendiendo el motor y accionando los controles correspondientes. Las excepciones son:
Accesorios para los que ha activado la funciónSolo cuando el motor está en marcha(por ejemplo, luces Aux 1, luces Aux 2, MotoLights y ropa calefactada). Para probar estas funciones, el motor de la motocicleta debe estar en marcha.
Algunas funciones de las luces de freno requieren que la motocicleta se desplace a una velocidad igual o superior a una determinada. Por ejemplo, las funciones«Flash on Emergency Stop» (destello en paradade emergencia) y«Flash on Rapid Engine Braking» (destello en frenadorápido del motor) requieren una desaceleración superior a 21 kilómetros por hora por segundo.
Paso 7: Complete la instalación.
Paso 7:
COMPLETE LA INSTALACIÓN
Complete la instalación de HEX ezCAN de la siguiente manera:
Asegúrese de que el cuerpo principal del HEX ezCAN esté bien sujeto en un lugar donde esté protegido de la presión, el calor y los impactos.
Asegúrese de que todos los cables y mazos de cables de fábrica, ezCAN y accesorios estén bien alejados de todas las piezas móviles y bien sujetos. Cuando sea necesario, utilice las bridas para cables incluidas en el kit de instalación HEX ezCAN.
Vuelva a colocar todos los componentes y sujetadores de la motocicleta que se hayan retirado para facilitar la instalación del HEX ezCAN.
Inspeccione toda la instalación en busca de errores o problemas y solucione todos los problemas que haya detectado.
Compruebe por segunda vez que todos los accesorios nuevos funcionan correctamente.
Guarde el manual en un lugar seguro en su ordenador, tableta o teléfono: contiene toda la información que necesita para manejar el HEX ezCAN y ajustar su funcionalidad.
¡Atención!
Ahora se le redirigirá a nuestro sitio web principal para que pueda consultar nuestra Política de privacidad.
Utilizamos cookies para garantizar que le ofrecemos la mejor experiencia en nuestro sitio web. Si continúa utilizando este sitio, asumiremos que está de acuerdo con ello.